Before you begin your eSIM installation process, there are a few things to be aware of:
Due to their confidentiality and security, eSIMs are only able to be downloaded once.
Make sure that your device is unlocked before installing your eSIM or the process will be unsuccessful.
Ensure your device is connected to WiFi & has a stable internet connection before installing your eSIM.
Do not remove the eSIM from your device as you will not be able to use it again.
Installation guide for your eSIM
Step 5
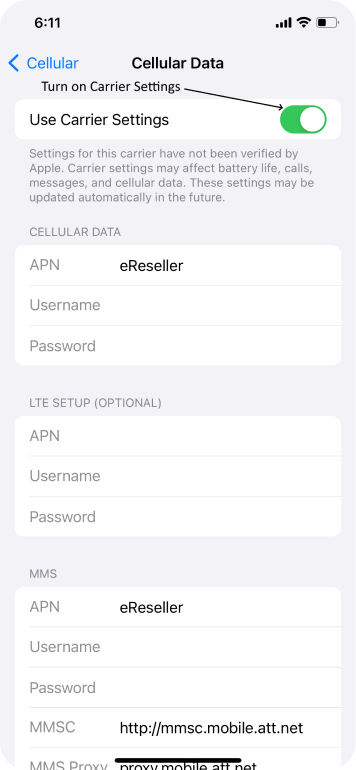
Follow the APN instructions located
here
to ensure that your network is working properly. For iOS 17, turn on Carrier Setting in the eSIM cellular settings.
If your device loses connection or battery during the eSIM process, simply re-scan the provided QR code and redo the above instructions.
That's it! Your plan is now active and you can start using your data.
Step 1
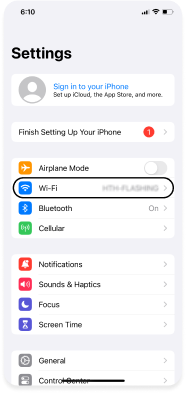
Connect your device to WiFi. Simply open your device settings and select WiFi or Wireless Networks. Select a WiFi Network from the list and enter the password if promoted.
Step 2
Next, open
Settings
on your device and select
Cellular Settings
or
Mobile Data
Step 3
Select
Download eSIM
or use the
Add eSIM
option.
Scan the QR code that was provided with your order to start downloading your eSIM.
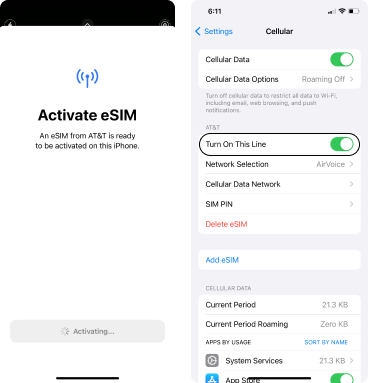
Step 4
After downloading and installing your eSIM, turn on your eSIM feature to enable its services.
Step 5
Follow the APN instructions located
here
to ensure that your network is working properly. For iOS 17, turn on Carrier Setting in the eSIM cellular settings.
If your device loses connection or battery during the eSIM process, simply re-scan the provided QR code and redo the above instructions.
That's it! Your plan is now active and you can start using your data.
Step 1
Connect your device to WiFi. Simply open your device settings and select WiFi or Wireless Networks. Select a WiFi Network from the list and enter the password if promoted.
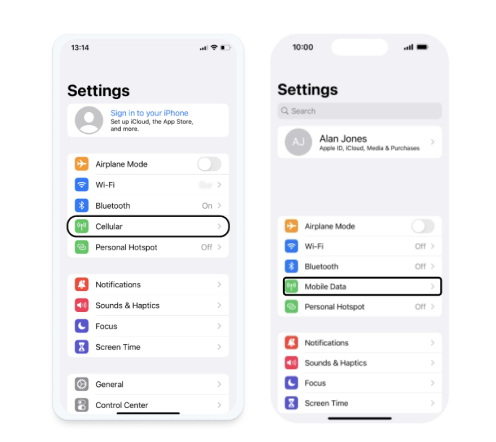
Step 2
Next, open
Settings
on your device and select
Cellular Settings
or
Mobile Data
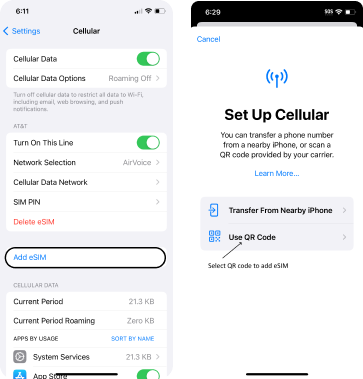
Step 3
Select
Download eSIM
or use the
Add eSIM
option.
Scan the QR code that was provided with your order to start downloading your eSIM.
Step 4
After downloading and installing your eSIM, turn on your eSIM feature to enable its services.
Step 5
Follow the APN instructions located
here
to ensure that your network is working properly. For iOS 17, turn on Carrier Setting in the eSIM cellular settings.
If your device loses connection or battery during the eSIM process, simply re-scan the provided QR code and redo the above instructions.
That's it! Your plan is now active and you can start using your data.
How do you know your eSIM is active?
01. Open "Settings" on your phone
02. Scroll down and tap the “Cellular” or “Mobile Data”option.
03. Check under the SIM section to make sure the eSIM is listed.
04. If you can’t see it, then your eSIM has not yet been activated.
To begin, connect your device to WiFi . Simply open your device settings and select WiFi or Wireless Networks. Select a WiFi Network from the list and enter the password if promoted.
2
Next, open Network Settings on your device and select eSIM erase or Delete to begin the eSIM removal process.
3
Follow the devices removal process to remove the installed eSIM.
Important notice: If you remove your eSIM from the device, your voice, data, and text services will be removed from your phone and you will be unable to reinstall your eSIM.eSIM cannot be redownloaded once removed or erased from your device
Need help? We are here for you
If any issues occur during your eSIM installation process, please contact our Customer Service department at 888-944-2355.Alternatively, click the button below to submit your request, and our team will promptly review and process it.Contact Support